
Are you looking for a step-by-step guide on how to set up GA4? If so, then look no further because, in this guide, we will show you how to step GA4 step-by-step.
How To Setup GA4 If You Don’t Have an Existing Google Analytics Account?
Here are the steps to set up your GA4 account when you don’t have an existing Google Analytics account:
- Sign in to your Google account.
- Go to analytics.google.com, and select the blue “Start Measuring” button to create your Google Analytics account.
- Give your Analytics account a name and select the data sharing options you’re comfortable sharing with Google and its affiliates.
- Click “Next” to create your Google Analytics 4 Property. A Google Analytics 4 Property is the entity you’ll link to your website or app which allows you to see and measure visitor data.
- Enter the name for your property, such as your website, app, or business name.
- Select the country and time zone of where you live or where the headquarters of your business is located.
- Choose your country’s currency as well and click “Next”.
- Under the “Business information” section, choose your industry category from the dropdown, prefilled options, and business size.
- Then check off any boxes that apply to how you intend to use Google Analytics 4.
- Finally, select “Create” and make sure to accept the Analytics terms of service.
How To Setup GA4 If You Already Have an Existing Google Analytics Account?
If you already have an existing Google Analytics account then you might be using Google Analytics Universal property. But now if you want to switch to Google Analytics 4 property then here are steps to setup GA4:
- Navigate to your existing Google Analytics account.
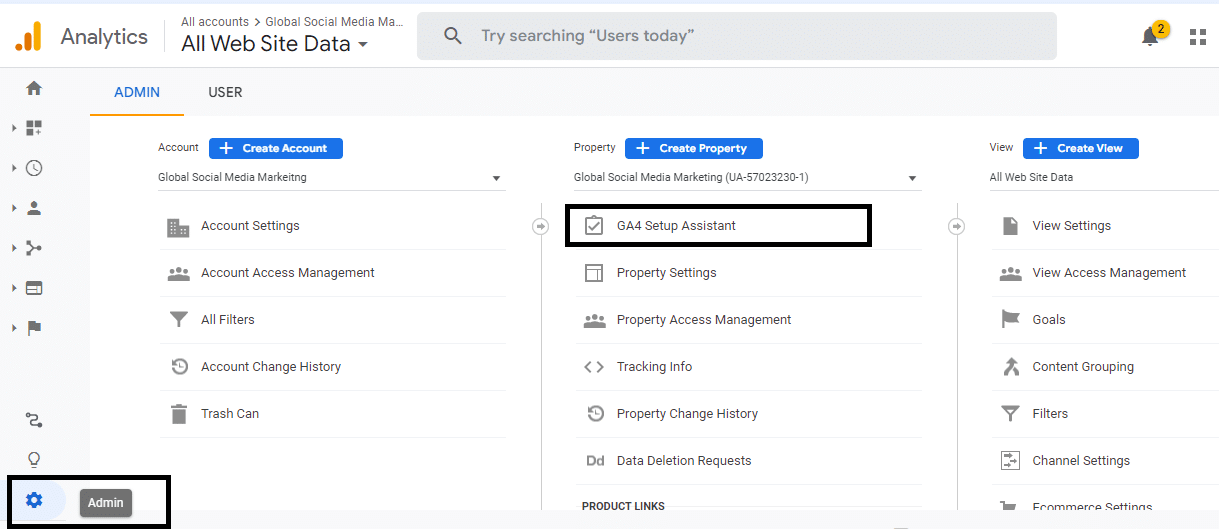
- Click the “Admin” tab from the bottom left corner of your Google Analytics dashboard.
- Go to the “Account” section and from the “Account” dropdown menu, choose the account you’d like to switch to Google Analytics 4.
- Then, go to the “Property” section and from the “Property” dropdown menu, choose the property you’d like to switch.
- In the Property column, select “GA4 Property Assistant Setup”.
6. A pop-up wizard window will appear and click on “Get Started”.
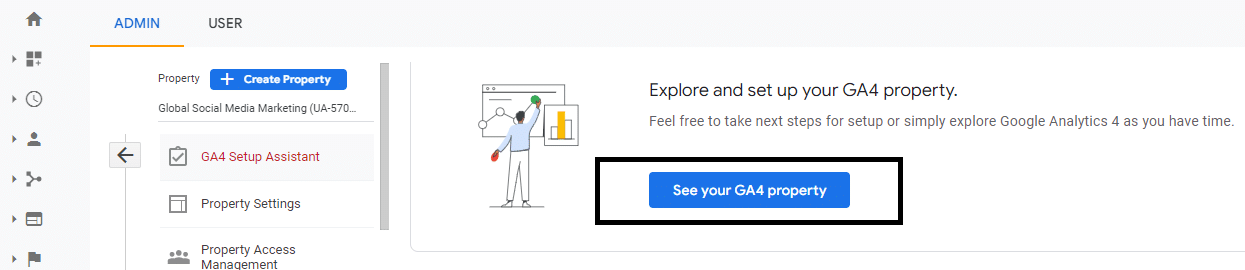
Great! You’ve just created your Google Analytics 4 Property!
How To Setup Data Collection and Tracking in Google Analytics 4?
One of the most common problems when using Google Analytics 4 to track web or app data is it just isn’t plugged in properly. When Google Analytics 4 isn’t connected to your website, you won’t be able to tell who’s landing on your site, what actions they’re taking, or if they’re converting. So, make sure to set up a data stream and tracking for your website so that Google Analytics 4 properly tracks your property. Here is how you can:
Create a Data Stream
- Visit your Google Analytics 4 account, navigate to the bottom left corner and click the “Admin” gear icon.
- Under the Property column, select data streams. If you are setting up a data stream to track a website, select “Add Stream” on the right and then choose “Web”.
- If you already have a data stream, a notice will pop up for creating another. Select yes if you wish to create another data stream as I’ll be doing in this example.
- Under “Set up your web stream,” enter the URL of your website and a stream name, such as “My Website’s Data Stream”.
- Leave the Enhanced Measurement toggle switched on to allow the data stream to automatically collect information on page views and other user events happening on your site.
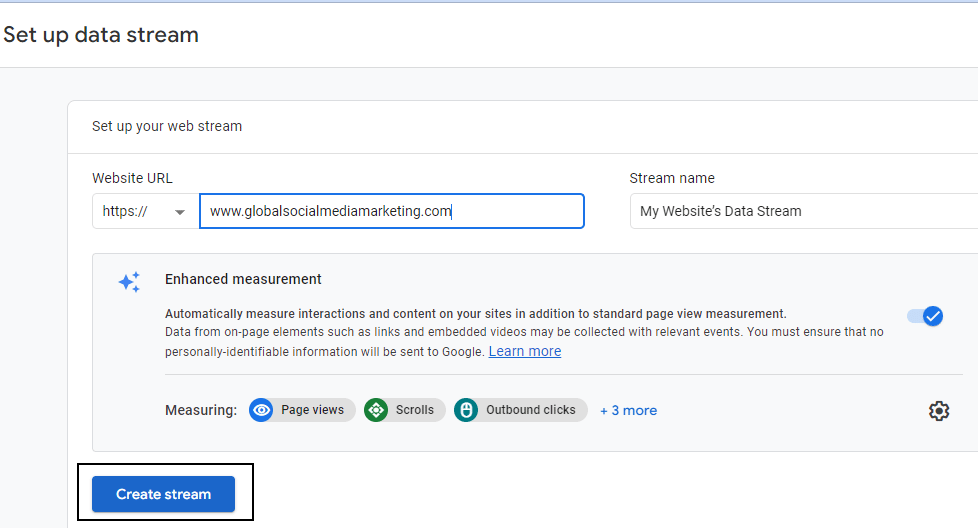
6. Select “Create Stream” and Voila — you’ve set up your data stream!
Connect Data Stream to Your Website
Next, connect your newly created data stream to your website via a global site tag. Global Site Tag is a snippet of HTML code that Google Analytics 4 generates for you to add to your web pages. While there are many ways to add this tag, we’re going to cover adding the tag directly to a web page.
- Return to the property column of the Admin page and choose “Data Streams”.
- Select the data stream you just created and find the “Tagging Instructions” section indicated with a wrench icon.
- Under “Add new on-page tag” click the “Global site tag” drop down to reveal a text dialogue box of the site tag.
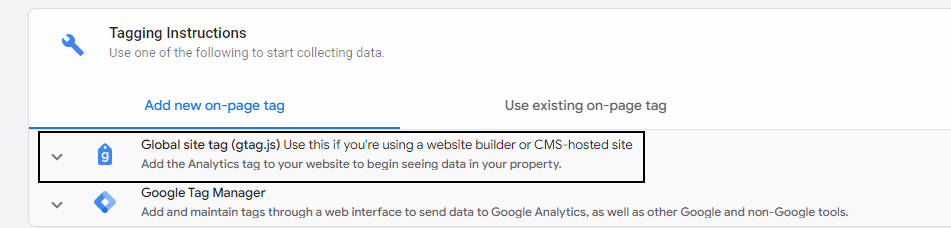
- 4. Copy the code in this text box using the “copy” icon in the top right of that box.
- 5. Now, open another tab and paste that code into the “<head>” section of the web page you’d like to track. If you have a website builder like WordPress, there’ll be a master head code section where you can paste this code to allow the tag to all of your website pages which can be a big time saver. For this example, I’m going to start from the backend login of our GSMM WordPress Website. Go to settings > Header and footer -> paste code -> then click save. Once this code is pasted and saved on your website page, Google Analytics 4 will start collecting data within 24 hours.
Test Analytics Tracking
Finally, check that the Analytics site tag is tracking your website properly.
- Open up a page on your website with the Google Analytics 4 site tag installed. Let’s use our roofing sales funnel landing page as an example here.
- In the home dashboard of Google Analytics 4, under the Reports section, select “Realtime”.
- Here, you should see blue data populating in the “Views by page title and screen name” dialogue box.
- If blue data representing site users are not populating in the “Realtime” tab, then you may need to reinstall the tag on your page as it may be implemented incorrectly.
User Settings and Account Linking
Google Analytics 4 allows you to provide account access to different users based on your business needs. To link your GA4 property to Google ads, you’ll need to edit level permission in Google Analytics and admin level permission in Google ads. Without the correct level of permissions, you won’t be able to link your accounts. So, let’s look at how to configure user settings and account linking in GA4:
- Navigate to your Google Analytics dashboard.
- Go to the admin section from the bottom left corner and select “Admin.”
- On the left side of the page, in the “Account” section, you’ll see “Account Access Management.” Select it and Here is where you’ll provide access to a user at the account level.
- Select the blue plus button in the top right-hand corner and then click add users.
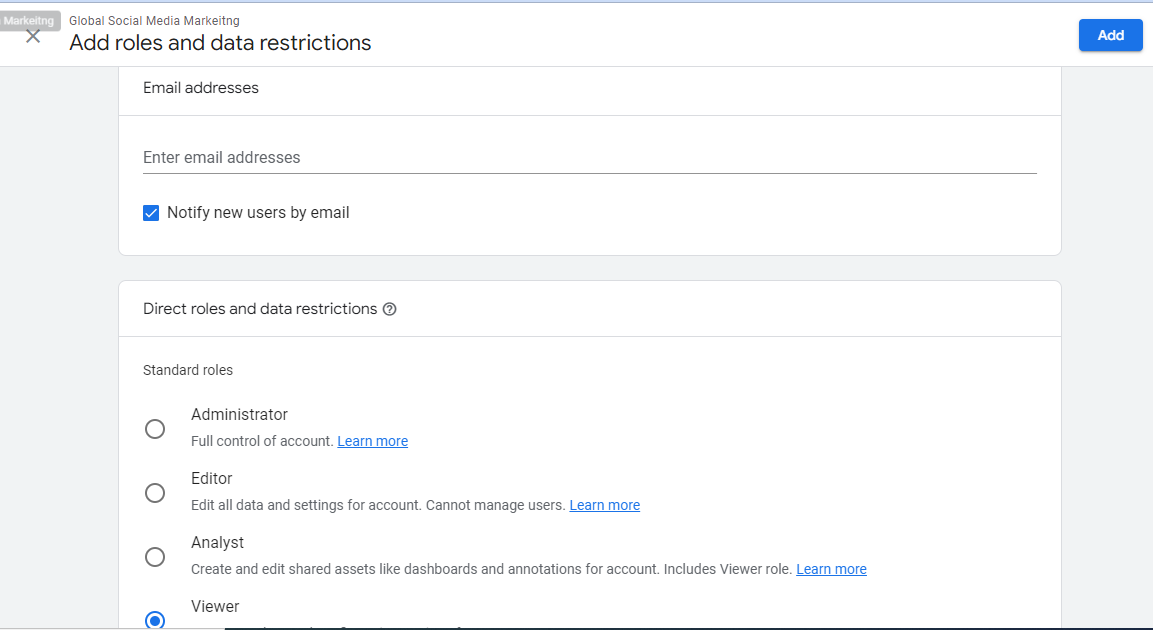
- Once the “Add Roles and Data Restrictions” screen appears, enter the email address of the user you would like to add.
- Now, provide the necessary roles and data restrictions.
- Select “Add” to complete adding the user.
- You can now exit the account access management page by selecting the “X” in the top left-hand corner of the screen.
Next, make sure you’ve also provided access to the specific property or properties needed, as well.
- Under “Property,” select “Property Access Management.”
- Click on the blue plus button in the top right corner and select add users.
- Enter the email address of the user, and then define the notification, role, or restrictions of that user.
- Once completed, select “Add.”
- Exit the property access management page by selecting the “X” in the top left-hand corner of the screen.
Next, you’ll need to link Google Ads to GA4. Go back to the Property column and select “Google Ads Links.”
How to Link Google Ads To GA4?
- Go back to the Property column and select “Google Ads Links.”
- In the top right, you can now see the link button is available, showing you can link the accounts. So, select “Link.”
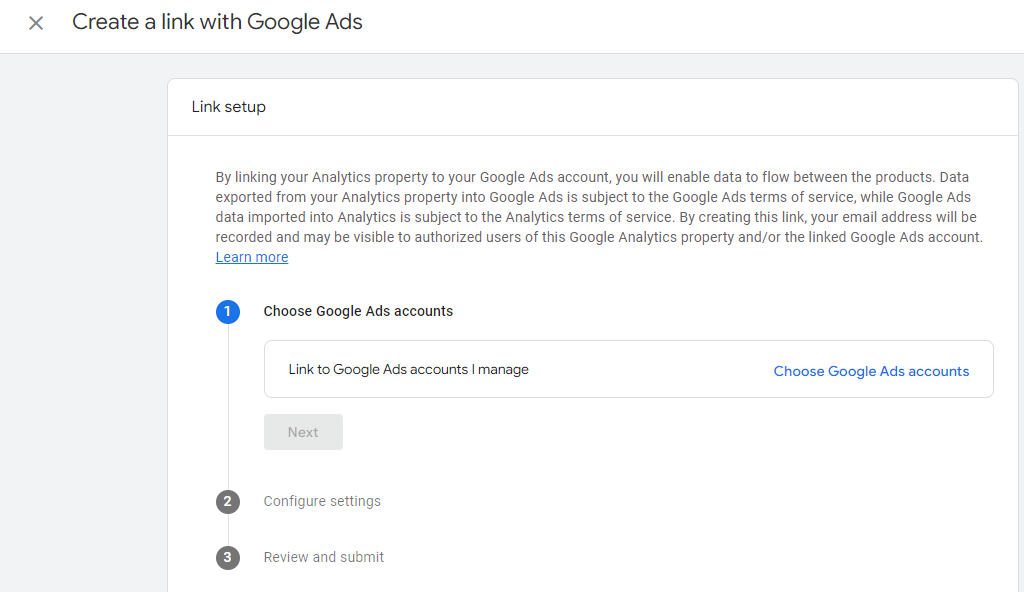
- To create a link with Google Ads, select “Choose Google Ads accounts.”
- Now you need to select the account and then click “Confirm”.
- You’ll be directed back to the “Create a link with Google Ads” menu.
- Now, select “Next” and it will bring you to “Configure Settings.”
- You’ll notice “Enable Personalized Advertising” is toggled on as a default. Leave this option enabled. This means any audience lists you create in your GA4 property will automatically become available in Google ads.
- Leave auto-tagging enabled, which automatically pulls the correct data from Google Ads into my Google Analytics reports.
- Select “Next.” Review your selections and, once approved, select “Submit.”
When you close the configuration panel, you’ll see your Google Ads and Google Analytics 4 accounts are linked. Now you can start diving into valuable data and see different information to learn about who’s coming to our website, how they got there, drop-off points, as well as different conversion metrics.
GA4 Setup Benefits
Visually Organized Data
It is basically an interface to aggregate and visually organize data from websites and apps. The analytics hub specifically generates reports in a similar way that excel organizes data in pivot tables, except Google creates visualizations. The UI is more eCommerce-focused as requested by companies. GA4 interface has acquisition, engagement, and monetization reports. It includes new features of all events with a table report of all the events you will be collecting in GA4. It also includes events specific to eCommerce stores and an explore section to start thinking like a data scientist. 4 main GA4 sections are:
- Acquisition — Users are coming from where such as an Overview, User Acquisition, and Traffic Acquisition.
- Engagement — How much time people are spending on your website and what actions are they taking.
- Monetization is a new term for eCommerce reporting.
- Retention — How users are being retained over time via cohort and engagement.
Quickly Find Results With Search Bar, Template Gallery, and User Lifetime Features
The search bar allows you to look at things like reports, ask questions answered by machine learning, and can search for help questions. Using the GA4 search bar you can quickly locate your results without spending much time. GA4 can help you understand the Overview of revenue from buyers, e-commerce Purchase reports — what items are being purchased on the site, In-app purchases, and Publisher ads. Demographics can help you look at users by country, gender, interests, age, and Technology is seeing how much data is coming from which platform (web, app, etc.).
Conversions are the most important event for your business. Real-time reports give you the ability of an overview of where users are in the customer journey. Template gallery offers you various report templates which you can use to measure your website’s performance. Visit “template gallery” and you will see a variety of reports. Another great feature is the User lifetime technique. On the analysis hub, click on “User lifetime” & will open a user lifetime analysis. It allows you to deep dive into information on your user. Click “+” by Dimensions to add dimensions to the user. Click “+” by Metrics to dive into LTV, predictive metrics, and other metrics. You can create a segment overlap to visualize what portion of promotion users (people that have seen promotions) and purchases. It can be used for remarketing techniques as well. If you are using Google Tag Manager, check out this free resource from Clickvoyant.
GA4 Setup Services
If you want to learn more about the setup for Data Collection and Tracking, User settings, and Account Management, Global Social Media Marketing offers GA4 services to set up advanced features of your GA4 as well. Feel free to contact us here!